Tattoo Hot Sauces
Goat Cheese Stuffed Burgers with Guacamole and Caramelized Onions

Goat Cheese Stuffed Burgers with Guacamole

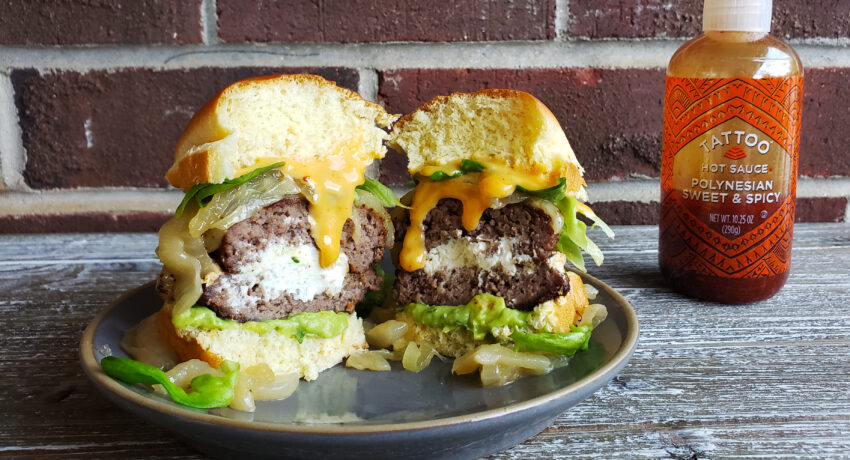
When you can get hot, double cheesy goodness, caramelized onions, and guacamole all in one, you know it’s going to be good! These burgers come out to the size of sliders, but trust us they will fill you up. Add a side of tortilla chips to accompany your guacamole and you’ve got a winning dinner recipe. What are you waiting for?? Grab the recipe below.

Goat Cheese Stuffed Burgers with Guacamole

Ingredients:

    CARAMELIZED ONIONS:

  • 2 tablespoons olive oil
  • 2 tablespoons unsalted butter
  • 2 large vidalia, or sweet onions, sliced
  • 1/4 teaspoon salt
  • 1 tablespoon brown sugar
  • QUICK GUACAMOLE:

  • 2 avocado, mashed
  • 2 tablespoons chopped freshly cilantro
  • 2 tablespoons diced sweet onion
  • 1/2 jalapeno pepper, seeded and diced
  • 1/4 teaspoon salt
  • 1/4 teaspoon pepper
  • the juice of 1 lime
  • POLYNESIAN MAYO:

  • 1/2 cup mayo
  • 3 tablespoons Tattoo Polynesian Sweet & Spicy hot sauce (or to taste)
  • GOAT CHEESE STUFFED BURGERS

  • 1 pound ground beef
  • 1 teaspoon salt
  • 1 teaspoon pepper
  • 1/2 teaspoon garlic powder
  • 4-6 ounces cold goat cheese log, cut into 1/2-inch thick slices
  • 1 tablespoon olive oil
  • 1 tablespoon unsalted butter
  • 4 ounces sharp cheddar cheese
  • 2 cups spring greens
  • 4 Hawaiian roll buns, toasted

Instructions:

    CARAMELIZED ONIONS:

  1. Heat a large skillet over low heat. Add the olive oil and butter. Once melted, add in the onions and the salt, stirring well to coat. Cover and let cook for 25 to 30 minutes, stirring often, until golden and soft.
  2. Stir in the brown sugar and cook for another 10 minutes.
  3. QUICK GUACAMOLE:

  4. Mix all ingredients together until combined. Taste and season additionally if needed.
  5. POLYNESIAN MAYO:

  6. Whisk ingredients together until combined.
  7. GOAT CHEESE STUFFED BURGERS:

  8. Place the ground beef in a large bowl and season with the salt, pepper and garlic powder. Mix gently to coat and then divide the beef into four equal sections.
  9. Break apart each section and form it into two patties – one for the top and one for the bottom. Place a round of goat cheese in the center of one patty and cover it with the other patty, pressing gently around the edges to seal the goat cheese in. Repeat with remaining beef.
  10. At this point you can grill the burgers – I chose to use the skillet that the onions were cooked in. Heat a skillet over medium-high heat and add the olive oil and butter. Cook the burgers until your desired doneness. Add cheddar slice on top 1 minute before patties are done.
  11. To assemble the burgers, spread a few tablespoons of guac on the bottom bun and place the burger on top. Cover with some caramelized onions, BBQ mayo and spring greens. Serve immediately!

We’d love to see what you’re combining your hot sauces with, and what you create in your own kitchen! Remember to snap a shot and use the #tattoohotsauce hashtag or tag us @tattoohotsauce to make sure we see your creations.

Original Recipe by: How Sweet Eats blog.

Chicken and Waffles with Spicy Maple Syrup

Spicy Chicken and Buttermilk Waffles

Give mom a break and treat her this Mother’s day to an amazing Sweet and Spicy Chicken and Cinnamon Buttermilk Waffles! And then make a lil extra for yourself too, cuz this is seriously good.

Spicy Chicken and Cinnamon Waffles

Ingredients:

    FOR THE FRIED CHICKEN:

  • 1 teaspoon kosher salt
  • ½ teaspoon freshly ground black pepper
  • 1 teaspoon paprika
  • ½ teaspoon garlic powder
  • ½ teaspoon onion powder
  • 1/8 teaspoon cayenne pepper
  • 2 pounds boneless, skinless chicken breasts or chicken tenders
  • Vegetable oil, for frying, as needed
  • 1 cup buttermilk
  • 1 egg
  • 1½ cups all-purpose flour
  • 1 tablespoon cornstarch
  • FOR THE CINNAMON BUTTERMILK WAFFLES:

  • 2 cups all-purpose flour
  • 2 tablespoons granulated sugar
  • 2 teaspoons baking powder
  • 1 teaspoon baking soda
  • ½ teaspoons salt
  • 1 teaspoon ground cinnamon
  • 2 cups buttermilk
  • ½ cup unsalted butter melted
  • 2 large eggs
  • FOR THE HOT SAUCE MAPLE SYRUP:

  • ½ cup maple syrup, warmed
  • 2 teaspoons Tattoo Hot Sauce, we used Scotch Bonnet Curry

Instructions:

    Instructions:

    FOR THE FRIED CHICKEN:

  1. In a small bowl, combine the salt, pepper, paprika, garlic, onion powder and cayenne. Season the chicken breasts with the mixture and place in a medium bowl. Let the chicken marinate in the spices for at least an hour.
  2. Fill a large frying pan halfway with vegetable oil. Heat the oil to 350ºF.
  3. Whisk the buttermilk and egg together in a medium bowl. In a separate, shallow bowl stir flour and cornstarch together. One piece at a time, dip chicken in the buttermilk then dredge in the flour mixture. Fry in the oil until the chicken is golden brown on all sides. Remove the chicken from the oil and place on paper towels to drain the excess oil.
  4. FOR THE CINNAMON BUTTERMILK WAFFLES:

  5. While the chicken cooks, begin to make the waffles. In a medium mixing bowl whisk together the flour, sugar, baking powder, baking soda, salt and cinnamon.
  6. 5In large mixing bowl whisk together the buttermilk, melted butter and eggs until thoroughly combined. Slowly stir the dry ingredients into the wet ingredients, until just combined.
  7. Spray waffle iron with vegetable oil cooking spray then spoon the mix into waffle maker until the surface is completely covered and cook until golden brown according to waffle maker instructions. Repeat with remaining waffle batter.
  8. While the waffles cook, whisk the maple syrup and hot sauce together in a small bowl and set aside.
  9. Place one or two pieces of chicken on top of a waffle and pour spicy maple syrup over the top of both. Enjoy!

We’d love to see what you’re combining your hot sauces with, and what you create in your own kitchen! Remember to snap a shot and use the #tattoohotsauce hashtag or tag us @tattoohotsauce to make sure we see your creations.

Original Recipe by: Cooking With Cocktail Rings blog.

Spicy Authentic Enchiladas Verdes

Kick back this Cinco de Mayo with this authentic enchiladas verdes recipe by Concinando Con Angel! Top off with Avocado Serrano, and we guarantee you will never go back!

Spicy Authentic Enchiladas Verdes with Avocado Serrano

Ingredients:

  • 1 chicken breast, cooked and shredded (we recommend buying a rotisserie chicken to make it easier)
  • 1 pack of tortillas
  • ½ – 1 lb of tomatillos, washed and peeled (peel off the outer husk, and then wash to remove the sticky-feel)
  • 1 quarter of a small onion
  • 2 garlic cloves
  • 2 serrano peppers
  • 1 jalapeño pepper
  • 1 cilantro bunch (or to taste)
  • 3 poblano peppers, grilled or roasted, peeled and de-seeded
  • 3 tablespoons, sliced onion
  • 1 garlic clove, minced
  • 1 tablespoon chicken bouillon powder
  • Vegetable oil (or your choice of oil)
  • For Garnish:

  • Queso fresco (the soft, crumbly cheese)
  • Mexican Sour Cream (OR use regular sour cream, add a bit of milk until it becomes a nice drizzling consistency, and then add salt to taste)
  • Lettuce
  • Tomato
  • Avocado
  • Tattoo Avocado Serrano

Instructions:

    For the enchilada verde salsa:

  1. In a medium pot, place your tomatillos, quarter onion, jalapeño pepper, serrano peppers, and garlic cloves. Fill up with enough water to allow the ingredients to float and not touch the bottom. Boil until you see the tomatillos start to change color. Turn off and remove from heat.
  2. Meanwhile, in a large pan, add a drizzle of oil over medium heat and stir-fry your sliced onions and minced garlic until fragrant. Do not allow the garlic to burn.
  3. Add your shredded chicken breast to onions and garlic, season with salt and pepper, and saute for a couple of minutes until the onions and garlic are incorporated. Turn off heat.
  4. Remove tomatillos, onion, jalapeño, serrano peppers, and garlic cloves from pot, and place into a blender, removing any stems from peppers. NOTE: for less spicy, de-seed your peppers first before placing into blender.
  5. Add cilantro, chicken bouillon powder, roasted poblano peppers, pepper and cold water into blender. Blend until smooth.
  6. In a large pot, add a drizzle of oil and set to medium heat. Carefully pour in the salsa verde, and stir. At this point, taste test your salsa for salt. Adjust as needed. Let it come to a boil, and then turn off heat.
  7. Assembling the enchiladas:

  8. In a medium pan set to medium-low heat, pour in 1 teaspoon of oil. Place your tortilla in the pan and allow one side to saturate with oil, before flipping over and saturating the other side, about 10 seconds per side. You want the tortillas to be more ‘floppy’, not crispy. Then remove from pan, placing on a plate lined with paper towel to soak up excess oil. You can prep all the tortillas like this at once, adding oil to the pan as needed, or make one enchilada at a time, continuing with the next steps.
  9. Dip your prepped tortilla into the pot of salsa verde, flipping to saturate both sides with the salsa. Let excess drip off, and then place on your plate.
  10. Next, add shredded chicken on one side of your tortilla, and roll up using tongs (or clean hands). The seam of the tortilla should be tucked underneath so it doesn’t unroll itself.
  11. Now for the finale! Add your queso fresco, sour cream, tomato, lettuce, avocado and drizzle with Avocado Serrano to your heart’s content. ¡Buen provecho!

We’d love to see what you’re combining your hot sauces with, and what you create in your own kitchen! Remember to snap a shot and use the #tattoohotsauce hashtag or tag us @tattoohotsauce to make sure we see your creations.

Spicy Stuffed Jack-o-Lantern Peppers

Okay, we’ll admit it. These Spicy Stuffed Jack-o-Lantern Peppers are more cute than they are scary. They are, however, a fun and creative way to use up leftover chili from the previous Spicy Crockpot Chili recipe. Here’s how to do it:

Spicy Stuffed Jack-o-Lantern Peppers with Himalayan Chile

Ingredients:

Ingredients:

    For the Seasoning:

  • Spicy Chili, either fresh or refrigerated (see previous recipe)
  • Orange Bell Peppers
  • Mexican 4 blend shredded cheese
  • Tattoo Himalayan Chile for ‘blood’ decoration

Instructions:

  1. Preheat oven to 350 and grease (or line with parchment paper to make oil-free) a Dutch oven or a casserole dish and use foil later to cover it.
  2. Using a sharp knife carefully cut the top off. Cut away the seed portion that will probably stay with the top. Then cut away any of the whiteish parts on the inside ribs and remove any seeds that fell in.
  3. Now you will use a small paring knife to cut out the face. You can use any Jack-O-Lantern patterns, but be mindful that the holes aren’t too big or your chili will run out through the very holes you just cut. Pro-tip: place one bean in each eye to help with leakage.
  4. Stuff peppers with the cooked chili. It can be hot or from the fridge since you will be cooking them. Top with enough cheese to cover the chili.
  5. Place stuffed peppers in the Dutch oven, (or in a casserole dish), cover and cook for 20 to 30 minutes or until the peppers are easily pierced. You can also place the cut pepper tops on a pan to bake at the same time.
  6. Once they are done baking, they will be hot and oozing, so use a large spoon to scoop them onto a plate. Carefully pour some more Tattoo Himalayan Chile into the eyes and over the edges of the top for an ‘oozy blood’ effect. And you’re done!

We’d love to see what you’re combining your hot sauces with, and what you create in your own kitchen! Remember to snap a shot and use the #tattoohotsauce hashtag or tag us @tattoohotsauce to make sure we see your creations.

Credit: Original Recipe by Kathy Hester for One Green Planet.

Spicy Crockpot Chili with Tattoo Himalayan Chile

Wanna know our favorite game day must-have? A good ole pot of spicy chili – especially once the chilly weather kicks in (no pun intended). Just throw all the ingredients together in a Crockpot, and let it do the work for you. What more could you ask for? Check out this tailgate-approved recipe below:

Spicy Crockpot Chili with Tattoo Himalayan Chile

Ingredients:
(This recipe is for a 6 quart Crockpot)

    For the Seasoning:

  • 4 tbsp chili powder
  • 1 tbsp ground coriander
  • 1 tbsp ground cumin
  • 1 tsp ground cayenne pepper
  • 1 1/2 tsp garlic powder
  • 1 tsp onion powder
  • 1 tsp oregano
  • 1 Tbsp Tattoo Himalayan Chile
  • For the Chili:

  • 2 1/2 lbs ground beef 15% or lower
  • 1/2 medium yellow onion
  • 2 cloves garlic
  • 2 large jalapeños
  • 1 tbsp salt
  • 30 oz canned diced tomatoes
  • 32 oz pinto bean
  • 32 oz Kidney Beans
  • For the Garnish:

  • 4-6 oz grated cheese
  • 1/2 medium yellow onion
  • 1-2 large jalapeños
  • Sour Cream (to taste)
  • Tattoo Himalayan Chile

Instructions:

  1. Add all the chili seasoning spices together and mix.
  2. Chop the onion, jalapeño and the garlic for the meat.
  3. Take about a cup of kidney beans and a cup of pinto beans and put them in a blender. Blend for 2 minutes; set aside.
  4. In a cast iron skillet, brown the ground beef over medium heat for about 5 minutes and drain.
  5. Stir in about 3 tbsp of the chili seasoning, 2 tsp of salt, and the onion, garlic and half of the jalapeños.
  6. Cook for about 2 minutes, chopping up the meat into small pieces.
  7. Add the meat mixture, tomatoes, and beans into crock pot and stir together. Add bean paste
  8. Now add the bean paste, 2-3 more tbsp of chili seasoning, Tattoo Himalayan Chile and remaining chopped jalapeño.
  9. Cook for about 4-6 hours in the crock pot on low.
  10. Set heat on crock pot to warm about 30 minutes prior to serving. Add the remaining 2 tsp of salt slowly, tasting as you go until you get the flavor that you want.
  11. Top with garnishes, serve with a side of crackers/tortilla chips if desired, and dig in!

We’d love to see what you’re combining your hot sauces with, and what you create in your own kitchen! Remember to snap a shot and use the #tattoohotsauce hashtag or tag us @tattoohotsauce to make sure we see your creations.

Credit: Original Recipe by Dad with a Pan blog. View original recipe here.

Tattoo Spicy Pumpkin Soup with Scotch Bonnet Curry hot sauce

Tattoo Spicy Pumpkin Soup with Scotch Bonnet Curry

We’re not trying to brag or anything (okay, maybe just a little), but this Spicy Pumpkin Soup with Tattoo Scotch Bonnet Curry is one of our favorite fall-time indulgences. The heat in this isn’t too crazy – just enough to add some flavor and make you feel all warm & fuzzy inside and perfect for a chilly, fall day.

Tattoo Spicy Pumpkin Soup with Scotch Bonnet Curry

Ingredients:

  • 4 tablespoons olive oil, divided
  • One 4-pound sugar pie pumpkin
  • 1 large yellow onion, chopped
  • 4 large or 6 medium garlic cloves, pressed or minced
  • 1 Tbsp Tattoo Scotch Bonnet Curry
  • ½ teaspoon sea salt
  • ½ teaspoon ground cinnamon
  • ½ teaspoon ground nutmeg
  • ⅛ teaspoon cloves
  • Tiny dash of cayenne pepper
  • Freshly ground black pepper
  • 4 cups (32 ounces) vegetable broth
  • ½ cup full fat coconut milk, plus extra for garnish
  • 2 tablespoons honey (maple syrup works too)
  • ¼ cup pepitas (green pumpkin seeds)

Instructions:

  1. Preheat oven to 425 degrees Fahrenheit and line a baking sheet with parchment paper for easy cleanup. Carefully halve the pumpkin and scoop out the seeds.
  2. Slice each pumpkin halve in half to make quarters. Brush or rub 1 tablespoon olive oil over the flesh of the pumpkin and place the quarters, cut sides down, onto the baking sheet. Roast for 40 minutes or longer, until the orange flesh is easily pierced through with a fork. Set it aside to cool for a few minutes.
  3. Heat the remaining 3 tablespoons olive oil in a large Dutch oven or heavy-bottomed pot over medium heat. Once the oil is shimmering, add onion, garlic and salt to the skillet. Stir to combine. Cook, stirring occasionally, until onion is translucent, about 8 to 10 minutes. In the meantime, peel the pumpkin skin off the pumpkins and discard the skin.
  4. Add the pumpkin flesh, cinnamon, nutmeg, cloves, Scotch Bonnet Curry hot suace, cayenne pepper, and a few twists of freshly ground black pepper. Use your stirring spoon to break up the pumpkin a bit. Pour in the broth. Bring the mixture to a boil, then reduce heat and simmer for about 15 minutes, to give the flavors time to meld.
  5. While the soup is cooking, toast the pepitas in a medium skillet over medium-low heat, stirring frequently, until fragrant, golden and making little popping noises. Be careful not to burn. Transfer pepitas to a bowl.
  6. Once the pumpkin mixture is done cooking, stir in the coconut milk and honey. Remove the soup from heat and let it cool slightly.
  7. You can use an immersion blender to blend this soup in the pot, or transfer to blender, working in batches. Securely fasten the blender’s lid and use a kitchen towel to protect your hand from steam escaping from the top of the blender as you purée the mixture until smooth. Transfer the puréed soup to a serving bowl and repeat with the remaining batches.
  8. Ladle the soup into individual bowls. Drizzle some coconut milk, followed by Scotch Bonnet Curry hot sauce on top. Sprinkle pepitas over the soup and serve. Let leftover soup cool completely before transferring it to a proper storage container and refrigerating it for up to 4 days (leftovers taste even better the next day!). Or, freeze this soup for up to 3 months.

We’d love to see what you’re combining your hot sauces with, and what you create in your own kitchen! Remember to snap a shot and use the #tattoohotsauce hashtag or tag us @tattoohotsauce to make sure we see your creations.

Credit: Original Recipe by Kate from Cookie and Kate blog.

Tattoo Spicy Caribbean Shrimp Egg Rolls with Scotch Bonnet Curry

Quarantine definitely has us getting more creative in the kitchen, how about you guys?? Our own Chef Dan created this AMAZING Spicy Caribbean Shrimp Egg Rolls recipe. This is a great version of an egg roll with heat and sweet! This dish uses the famous Singapore Curry Noodle ingredients in an egg roll with heat from the Caribbean Scotch Bonnet peppers. We know you will love this one (we sure did)!

Tattoo Spicy Caribbean Shrimp Egg Rolls with Scotch Bonnet Curry

Ingredients:

  • 1 lbs shrimp, raw peeled and deveined
  • 1 egg white (save yolk to use as a sealer for the egg roll wrap)
  • 2 Tbsp. Cornstarch
  • ¼ cup cilantro
  • ¼ cup green onion, chopped
  • 1 Tbsp. Tattoo Scotch Bonnet Curry Hot Sauce
  • 2 Tbsp. Soy sauce
  • 2 cloves garlic, chopped
  • 1 tsp salt
  • 2 cups Cabbage, shredded
  • 1 cup Carrots, shredded or fine julienne
  • 2 cups Rice vermicelli noodles, rehydrated, and drained and squeezed dry
  • 2 cups Bean sprouts
  • 12 Egg Roll Wrappers
  • 6 Cups Oil for deep fryer (Can also be air-fried)
  • Sweet Red Chili Sauce

Instructions:

  1. In a food processor, put ½ of the shrimp, egg white, cornstarch, cilantro, green onion, Tattoo Scotch Bonnet Curry Sauce, soy sauce, garlic and salt.
  2. Pulse food processor until a paste is formed (do not over work!)
  3. Chop the other ½ of the shrimp into 1/3” pieces.
  4. Remove paste from food processor and put into large bowl. By hand add the rest of the ingredients (up to the egg roll wrappers) and mix all ingredients well so they are evenly dispersed.
  5. Heat Oil to 340®.
  6. Put about 2 ounces of the filling in the middle of the wrapper with the point of a corner facing you. Fold in the sides, and wrap tightly into a roll, brush the edge with the saved egg yolk whisked with a little water.
  7. Deep fry (or air fry) the egg roll until brown and crispy, about 4-5 minutes.
  8. Serve hot with a fifty-fifty mix of sweet red chili sauce and Tattoo Scotch Bonnet Curry Sauce for dipping. As always, dig in!

Hint: Traditional egg rolls are served with sweet and sour sauce or sweet red chili sauce mixed with Chinese hot mustard. Here we are substituting the hot mustard for the Tattoo sauce for the dipping sauce.


We’d love to see what you’re combining your hot sauces with, and what you create in your own kitchen! Remember to snap a shot and use the #tattoohotsauce hashtag or tag us @tattoohotsauce to make sure we see your creations.

Credit: Original Recipe by our own Chef Dan!

Tattoo Japanese Togarashi Pork Tankatsu Sandwich

In every culture there is some kind of fried cutlet, served crispy and often in a sandwich. Think of this version as an Asian fusion of Japanese flavors, in a Bahn Mi presentation on a brioche bun in the manner of an Iowa fair pork tenderloin sandwich. Talk about global fusion!

Tattoo Japanese Togarashi Pork Tankatsu Sandwich

Ingredients:

  • 4 Brioche Hot Dog or Hamburger Buns
  • 2oz Melted Butter
  • 8 ounces Pork Tenderloin, cut into 4 2 oz. medallions (cut from middle, save scraps for another dish)
  • 1 cup seasoned corn starch (seasoned with salt and pepper)
  • 2 eggs + ¼ cup of cold water
  • 2 cups Panko bread crumbs
  • 6 cups oil (for deep fryer). Can also be air-fried very nicely
  • 1 cup carrot, finely shredded
  • 1 cup cabbage Nappa, or green works fine, finely shredded
  • ½ tsp Rice wine vinegar
  • 1 tsp sugar
  • 1 tsp salt
  • ½ tsp ground black pepper
  • 12 thin sliced cucumber
  • 1/3 cup Tattoo Japanese Togarashi Hot Sauce

Instructions:

  1. Brush inside of buns with melted butter, set aside.
  2. Put pork medallions between 2 sheets of plastic wrap, with a mallet, pound slightly to the size of the bun, about ¼ “ thick.
  3. Mix cornstarch with salt and pepper in a bowl. In a separate bowl whisk water and egg, and in a third bowl pour in panko bread crumbs.
  4. Dip pork cutlet into cornstarch to coat, shake off excess and put in egg mix, move from egg and toss in panko crumbs until well coated all over.
  5. Heat oil to 360®.
  6. In the meantime, mix shredded carrot, cabbage, salt, sugar, pepper and rice vinegar in a bowl and let sit. At this point, slice your cucumbers.
  7. Fry pork cutlet until nicely brown, about 3 minutes
  8. Put toast buns in a sauté pan to get the inside brown and buttery.
  9. On bottom of bun drizzle a little Tattoo Japanese Togarashi Hot Sauce, top with sliced cucumber and cabbage slaw mix. Top with hot fried pork cutlet and drizzle more Tattoo Japanese Togarashi Hot Sauce on top bun and serve. Enjoy!

We’d love to see what you’re combining your hot sauces with, and what you create in your own kitchen! Remember to snap a shot and use the #tattoohotsauce hashtag or tag us @tattoohotsauce to make sure we see your creations.

Credit: Original Recipe by our own Chef Dan

Crockpot Chicken Tortilla Soup with Tattoo Hot Sauce

In NC, it can be 70 degrees one day, and 45 the next. At least we can say it makes life a little exciting! Regardless of what the weather is like in your part of the world, you’ll really enjoy this delicious Crockpot Chicken Tortilla Soup recipe! This is an easy Crockpot Chicken Tortilla Soup that can be topped with either Avocado Serrano or Scotch Bonnet Curry! Which will YOU choose? (Either way, you can’t lose!)

Crockpot Chicken Tortilla Soup with Tattoo Hot Sauce

Ingredients:

  • 3 tablespoons butter
  • 1 yellow onion diced
  • 1 red pepper diced
  • 1 yellow pepper diced
  • 2 cloves garlic
  • 2 cans chicken broth 14.5-ounce cans
  • 2 boneless skinless chicken breasts
  • 2 teaspoons cumin
  • 1 teaspoon chili powder
  • 1 teaspoon oregano
  • 1 teaspoon taco seasoning
  • 14 ounces red enchilada sauce

    Add-ins

  • 1-2 cups heavy cream to make it creamy if desired, add during last hour
  • 1 can pinto beans drained
  • 1 1/2 cups corn frozen, not canned.
  • Garnish:

  • 1/2 cup fresh cilantro chopped
  • Sour Cream
  • Tri-Color Tortilla Chips (I got it in the produce section around the veggies/salad area)
  • Tattoo (whatever is your favorite flavor, I like the Scotch Bonnet)
  • Instructions:

    1. Add butter to saute pan over medium heat. Add in peppers, onion and garlic and cook vegetables are slightly tender. Add to slow cooker.
    2. Place chicken breast on top of the vegetables, add remaining base ingredients and cook on high for 3-4 hours.
    3. Once the chicken is cooked shred the chicken.
    4. Add remaining ingredients or those add-ons that you wish to add and cook on high for 1 hour.
    5. Serve with your choice of garnishes, and finish topping with either Scotch Bonnet Curry or Avocado Serrano. Enjoy!

    We’d love to see what you’re combining your hot sauces with, and what you create in your own kitchen! Remember to snap a shot and use the #tattoohotsauce hashtag or tag us @tattoohotsauce to make sure we see your creations.

    Credit: Original Recipe by Sandra of Dash of Sanity blog. View original recipe here.

Garlic Chicken Stir Fry with Himalayan Chile

This delicious Garlic Chicken Stir Fry is super-satisfying and easy to make. The recipe calls for 1 tablespoon of our Himalayan Chile, but it’s safe to say you can top it off with as much Tattoo as you would like. We hope you’ll try it out – it makes an awesome lunch or dinner idea!

Garlic Chicken Stir Fry with Himalayan Chile

Ingredients:

  • 1 tablespoon + 1 teaspoon vegetable oil divided use
  • 1 cup broccoli florets
  • 1 cup mushrooms halved
  • 1 yellow bell pepper cored, seeded and thinly sliced
  • 1 pound boneless skinless chicken breast cut into 1 inch pieces
    salt and pepper to taste
  • 4 cloves of garlic minced
  • 3/4 cup chicken broth
  • 1 1/2 teaspoons sugar
  • 1 tablespoon soy sauce
  • 1 tablespoon Himalayan Chile Hot Sauce
  • 2 teaspoons sesame oil
  • 2 teaspoons cornstarch

Instructions:

  1. Place 1 teaspoon of oil in a large pan and heat over medium high heat.
  2. Add the broccoli, mushrooms and bell pepper to the pan. Cook for 5-6 minutes or until vegetables are tender.
  3. Remove the vegetables from the pan; transfer to a plate and cover with foil to keep warm.
  4. Wipe the pan clean with a paper towel, then heat the remaining tablespoon of oil over high heat.
  5. Add the chicken to the pan in a single layer and season with salt and pepper to taste. Cook for 3-4 minutes per side, or until chicken is browned and cooked through.
  6. Lower heat to medium, add the garlic and cook for 30 seconds. Add the vegetables back to the pan.
  7. In a small bowl, whisk together the chicken broth, sugar, soy sauce, sesame oil and cornstarch.
    Pour the sauce over the chicken mixture and bring to a simmer.
  8. Simmer for 1-2 minutes or until sauce has just thickened. Then drizzle on 1 tablespoon of Himalayan Chile Hot Sauce.
  9. Serve immediately, with steamed rice if desired.

We’d love to see what you’re combining your hot sauces with, and what you create in your own kitchen! Remember to snap a shot and use the #tattoohotsauce hashtag or tag us @tattoohotsauce to make sure we see your creations.

Credit: Original Recipe by The Recipe Critic blog. View original recipe here.

Pin It on Pinterest

Share This