Tattoo Hot Sauces

Spicy Stuffed Jack-o-Lantern Peppers

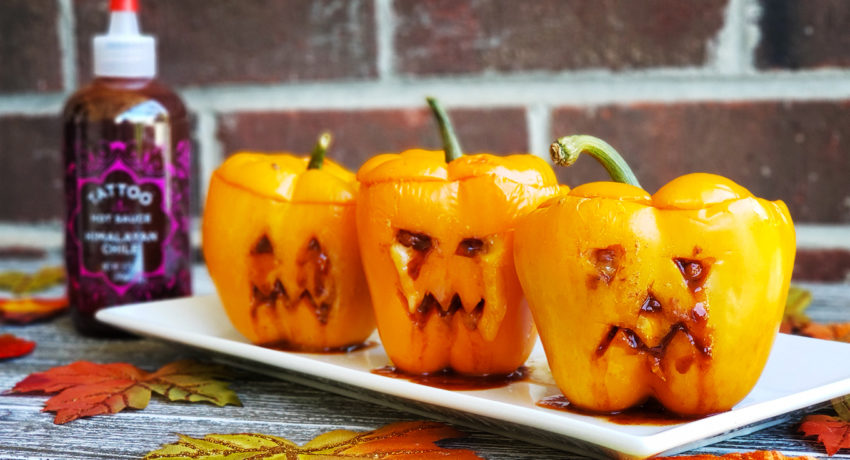
Okay, we’ll admit it. These Spicy Stuffed Jack-o-Lantern Peppers are more cute than they are scary. They are, however, a fun and creative way to use up leftover chili from the previous Spicy Crockpot Chili recipe. Here’s how to do it:

Spicy Stuffed Jack-o-Lantern Peppers with Himalayan Chile

Ingredients:

Ingredients:

    For the Seasoning:

  • Spicy Chili, either fresh or refrigerated (see previous recipe)
  • Orange Bell Peppers
  • Mexican 4 blend shredded cheese
  • Tattoo Himalayan Chile for ‘blood’ decoration

Instructions:

  1. Preheat oven to 350 and grease (or line with parchment paper to make oil-free) a Dutch oven or a casserole dish and use foil later to cover it.
  2. Using a sharp knife carefully cut the top off. Cut away the seed portion that will probably stay with the top. Then cut away any of the whiteish parts on the inside ribs and remove any seeds that fell in.
  3. Now you will use a small paring knife to cut out the face. You can use any Jack-O-Lantern patterns, but be mindful that the holes aren’t too big or your chili will run out through the very holes you just cut. Pro-tip: place one bean in each eye to help with leakage.
  4. Stuff peppers with the cooked chili. It can be hot or from the fridge since you will be cooking them. Top with enough cheese to cover the chili.
  5. Place stuffed peppers in the Dutch oven, (or in a casserole dish), cover and cook for 20 to 30 minutes or until the peppers are easily pierced. You can also place the cut pepper tops on a pan to bake at the same time.
  6. Once they are done baking, they will be hot and oozing, so use a large spoon to scoop them onto a plate. Carefully pour some more Tattoo Himalayan Chile into the eyes and over the edges of the top for an ‘oozy blood’ effect. And you’re done!

We’d love to see what you’re combining your hot sauces with, and what you create in your own kitchen! Remember to snap a shot and use the #tattoohotsauce hashtag or tag us @tattoohotsauce to make sure we see your creations.

Credit: Original Recipe by Kathy Hester for One Green Planet.

Spicy Crockpot Chili with Tattoo Himalayan Chile

Wanna know our favorite game day must-have? A good ole pot of spicy chili – especially once the chilly weather kicks in (no pun intended). Just throw all the ingredients together in a Crockpot, and let it do the work for you. What more could you ask for? Check out this tailgate-approved recipe below:

Spicy Crockpot Chili with Tattoo Himalayan Chile

Ingredients:
(This recipe is for a 6 quart Crockpot)

    For the Seasoning:

  • 4 tbsp chili powder
  • 1 tbsp ground coriander
  • 1 tbsp ground cumin
  • 1 tsp ground cayenne pepper
  • 1 1/2 tsp garlic powder
  • 1 tsp onion powder
  • 1 tsp oregano
  • 1 Tbsp Tattoo Himalayan Chile
  • For the Chili:

  • 2 1/2 lbs ground beef 15% or lower
  • 1/2 medium yellow onion
  • 2 cloves garlic
  • 2 large jalapeños
  • 1 tbsp salt
  • 30 oz canned diced tomatoes
  • 32 oz pinto bean
  • 32 oz Kidney Beans
  • For the Garnish:

  • 4-6 oz grated cheese
  • 1/2 medium yellow onion
  • 1-2 large jalapeños
  • Sour Cream (to taste)
  • Tattoo Himalayan Chile

Instructions:

  1. Add all the chili seasoning spices together and mix.
  2. Chop the onion, jalapeño and the garlic for the meat.
  3. Take about a cup of kidney beans and a cup of pinto beans and put them in a blender. Blend for 2 minutes; set aside.
  4. In a cast iron skillet, brown the ground beef over medium heat for about 5 minutes and drain.
  5. Stir in about 3 tbsp of the chili seasoning, 2 tsp of salt, and the onion, garlic and half of the jalapeños.
  6. Cook for about 2 minutes, chopping up the meat into small pieces.
  7. Add the meat mixture, tomatoes, and beans into crock pot and stir together. Add bean paste
  8. Now add the bean paste, 2-3 more tbsp of chili seasoning, Tattoo Himalayan Chile and remaining chopped jalapeño.
  9. Cook for about 4-6 hours in the crock pot on low.
  10. Set heat on crock pot to warm about 30 minutes prior to serving. Add the remaining 2 tsp of salt slowly, tasting as you go until you get the flavor that you want.
  11. Top with garnishes, serve with a side of crackers/tortilla chips if desired, and dig in!

We’d love to see what you’re combining your hot sauces with, and what you create in your own kitchen! Remember to snap a shot and use the #tattoohotsauce hashtag or tag us @tattoohotsauce to make sure we see your creations.

Credit: Original Recipe by Dad with a Pan blog. View original recipe here.

Garlic Chicken Stir Fry with Himalayan Chile

This delicious Garlic Chicken Stir Fry is super-satisfying and easy to make. The recipe calls for 1 tablespoon of our Himalayan Chile, but it’s safe to say you can top it off with as much Tattoo as you would like. We hope you’ll try it out – it makes an awesome lunch or dinner idea!

Garlic Chicken Stir Fry with Himalayan Chile

Ingredients:

  • 1 tablespoon + 1 teaspoon vegetable oil divided use
  • 1 cup broccoli florets
  • 1 cup mushrooms halved
  • 1 yellow bell pepper cored, seeded and thinly sliced
  • 1 pound boneless skinless chicken breast cut into 1 inch pieces
    salt and pepper to taste
  • 4 cloves of garlic minced
  • 3/4 cup chicken broth
  • 1 1/2 teaspoons sugar
  • 1 tablespoon soy sauce
  • 1 tablespoon Himalayan Chile Hot Sauce
  • 2 teaspoons sesame oil
  • 2 teaspoons cornstarch

Instructions:

  1. Place 1 teaspoon of oil in a large pan and heat over medium high heat.
  2. Add the broccoli, mushrooms and bell pepper to the pan. Cook for 5-6 minutes or until vegetables are tender.
  3. Remove the vegetables from the pan; transfer to a plate and cover with foil to keep warm.
  4. Wipe the pan clean with a paper towel, then heat the remaining tablespoon of oil over high heat.
  5. Add the chicken to the pan in a single layer and season with salt and pepper to taste. Cook for 3-4 minutes per side, or until chicken is browned and cooked through.
  6. Lower heat to medium, add the garlic and cook for 30 seconds. Add the vegetables back to the pan.
  7. In a small bowl, whisk together the chicken broth, sugar, soy sauce, sesame oil and cornstarch.
    Pour the sauce over the chicken mixture and bring to a simmer.
  8. Simmer for 1-2 minutes or until sauce has just thickened. Then drizzle on 1 tablespoon of Himalayan Chile Hot Sauce.
  9. Serve immediately, with steamed rice if desired.

We’d love to see what you’re combining your hot sauces with, and what you create in your own kitchen! Remember to snap a shot and use the #tattoohotsauce hashtag or tag us @tattoohotsauce to make sure we see your creations.

Credit: Original Recipe by The Recipe Critic blog. View original recipe here.

Himalayan Chile Shakshuka Recipe

They say cooking is love made visible. To be honest, we aren’t really sure who “they” are or when they said it, but we definitely agree! This Mother’s Day, serve up this delicious shakshuka recipe to show mom how much you care. If you aren’t familiar with shakshuka, it is a wonderful, flavorful dish of eggs poached on top of a bed of tomato sauce. Serve it up for breakfast or dinner! The dish itself has quite a history and a few variations, but we love this version.

Himalayan Chile Shakshuka Recipe

Ingredients:

  • 1 tbsp olive oil
  • 1/2 onion, peeled and diced
  • 1 clove garlic minced
  • 1 bell pepper, seeded and chopped
  • 4 cups ripe diced tomatoes, or 2 cans (14 oz. each) diced tomatoes
  • 2 tbsp tomato paste
  • 1/4 cup Himalayan Chile hot sauce (or to taste)
  • 1 tsp mild chili powder
  • 1 tsp cumin
  • 1 tsp paprika
  • Pinch of cayenne pepper, or more to taste (careful, it’s spicy!)
  • Pinch of sugar (optional, to taste. This helps tone down the acidity of the tomato sauce)
  • Salt and pepper, to taste
  • 6 eggs
  • 1/2 tbsp fresh chopped parsley (optional, for garnish)

Instructions:

  1. Heat a deep, large skillet or sauté pan on medium. Slowly warm olive oil in the pan.
  2. Add chopped onion, sauté for a few minutes until the onion begins to soften.
  3. Add garlic and continue to sauté till mixture is fragrant.
  4. Add the diced bell pepper, sauté for 5-7 minutes over medium until softened.
  5. Add tomatoes, tomato paste, and Himalayan Chile hot sauce to pan, stir until blended.
  6. Add spices and sugar, stir, and allow mixture to simmer over medium heat for 5-7 minutes until it starts to reduce.
  7. At this point, you can taste the mixture and spice it according to your preferences. Add salt and pepper to taste, more sugar for a sweeter sauce, or more cayenne pepper and/or Himalayan Chile hot sauce for a spicier shakshuka (take it easy with the cayenne, it is extremely spicy!).
  8. Crack the eggs, one at a time, directly over the tomato mixture, making sure to space them evenly over the sauce (5 around the outer edge and 1 in the center should do it). The eggs will cook “over easy” style on top of the tomato sauce.
  9. Cover the pan. Allow mixture to simmer for 10-15 minutes, or until the eggs are cooked and the sauce has slightly reduced. Keep an eye on the skillet to make sure that the sauce doesn’t reduce too much, which can lead to burning.
  10. If mom (or yourself) prefer shakshuka eggs more runny, let the sauce reduce for a few minutes before cracking the eggs on top – then, cover the pan and cook the eggs to taste.
  11. Garnish with the chopped parsley, if desired. Enjoy!

We hope you have a great Mother’s Day celebrating all the moms and mother-figures in your life!


We’d love to see what you’re combining your hot sauces with, and what you create in your own kitchen! Remember to snap a shot and use the #tattoohotsauce hashtag or tag us @tattoohotsauce to make sure we see your creations.

Credit: Original Recipe by Tori Avey. View original recipe here.

Tattoo Himalayan Sweet and Spicy Hot Wings

Himalayan Sweet and Spicy Hot Wings

Hot wing fanatic or not, these Himalayan Sweet and Spicy Hot Wings have pretty much become THE game night wings around our place.  Debuting on A Taste of New York and created by Chef Matt Pace, the flavor fusion of these sweet and spicy hot wings is SO good and we are excited to share it with you.
Try it for yourself, and if you want more heat, you can always indulge and throw in as much Himalayan Chile hot sauce as you desire.

Himalayan Sweet and Spicy Hot Wings

For sauce:

  • ½ cup sweet chili sauce
  • 2 Tbsp soy sauce
  • 2 Tbsp lime juice
  • 1 tsp ground ginger
  • 1 tsp kosher salt
  • 2 Tbsp Mountain Ridge Honey
  • 1 ½  Tbsp Himalayan Chile hot sauce
  • ½ cup chopped onion
  • 4 cloves garlic
  • 1 Tbsp black sesame seeds
  • 1 Tbsp white sesame seeds

For Chicken wings:

  • 2 cups all-purpose flour
  • ¼ cup corn starch
  • 2 Tbsp garlic powder
  • 2 Tbsp onion powder
  • 1 Tbsp paprika
  • 1 tsp white pepper
  • 1 tsp black pepper
  • 1 Tbsp kosher salt
  • 2 eggs
  • 6-10 chicken wings

Instructions:

  1. For your sauce, combine all sauce ingredients except the sesame seeds into medium saucepan and cook on medium heat until onions and garlic are cooked down and soft.
  2. Remove from heat and pour mixture into blender and purée until smooth.
  3. Pour sauce into medium bowl and add your sesame seeds, set aside.
  4. For your wings, combine all dry ingredients into large bowl or container and whisk ingredients together until mixed thoroughly.
  5. Beat eggs in separate bowl and set aside.
  6. Take wings and cover with dry mix, then dip into eggs, then back into dry mix, making sure wings are fully and well coated.
  7. Fry wings in 375 degree canola or peanut oil until golden brown.
  8. When wings are done, toss finished wings in sauce until fully coated and finish with diced green onion.
  9. Pour some Himalayan Chile hot sauce on your wings, sit back and enjoy.

We’d love to see what you’re combining your hot sauces with, and what you create in your own kitchen! Remember to snap a shot and use the #tattoohotsauces hashtag or tag us @tattoohotsauces to make sure we see your creations.

Credit: Chef Matt Pace of Cafe Booqoo

Pin It on Pinterest